Saturday 31 March 2012

"It's a (bad ass) Sony!"

Woah! Score! Went on a journey today to collect a Loewe Calida 5072 (yeah, they awesome-yet-problematic E3000 chassis again... with a 72cm screen! The ultimate CPS1/2/3 and Neo Geo screen...) and a SCART equipped Sony.

The Sony cost me $10. Picked it up from the garage of a friendly Vietnamese family. The TV belonged to their Grandma (maybe she died? I didn't ask...) Either way, the TV was in tip-top condition and also had the original remote intact. I was pretty amazed to see that this piece of history was made in West Germany! Firstly, I was expecting "Made in Japan" and, secondly, how strange it feels to have something that was made in a country that's no longer listed in the atlas...

So, after some kind words with my girlfriend (it's true what they say about Trinitrons: damn heavy!) we got the thing up the stairs. Plugged it in and was instantly astounded by how sharp the focus was! Craps all over my modded Blaupunkt in this regard. So far, so good!

Next, given the vintage (Germany reunified in 1990, right?), I was pretty keen to see what was under the hood. A few minutes of head scratching later, I found the 1 screw holding the back in place (3 plastic tabs do the rest of the job) and the cover slid off. I could hardly believe my eyes! Very different technology to the Loewes and Grundigs I'm used to. And, best of all, analogue potentiometers galore!

This bad boy is a keeper! Expect some serious front panel pots in the coming weeks!

(Further reading: Obsolete Technology Tellye ! )

Full frontal
WTF?! The original "It's a Sony" sticker intact 20+ years later?!
Sony KV-C27 (chassis AE-1)
Greetings Windows XP! Text is actually legible...
Nice geometry... no adjustments made (yet).
Convergence grid
Aliens vs Predator
Forgotten Worlds
Pang
What's this?! This adjustment is usually found on the flyback...
Amazing! The screen (and speakers) are completely shielded!
SCART port and external speaker jacks
Pots, glorious pots!
... and it doesn't stop there! 

Tuesday 27 March 2012

Bang and Olufsen MX6000 (no worky...)

Picked this up on eBay for $20.50. Seller said that the power switch doesn't work and that it should be an easy fix. Turned out to be more complicate than that... the power switch seemed fine to me. Something else is astray and I don't have the knowledge to fix it. It's gonna get sold or used for parts pronto.

Still, this is one gorgeous piece of machinery! This gloss black B&O MX6000 is probably the coolest looking TV I've ever come across...

Front
Back
Sticker
Back without cover
Chassis
Chassis
Chassis
Yoke and neckboard
Philips A66EAK 71X02 tube
Connections


Saturday 24 March 2012

A sorry end for our tubby tellies

Political commentator Annabel Crabb has written a story for the The Age newspaper about the sad demise of TVs. Of course, she's not writing from the perspective of a nostalgic CRT freak like me but she makes some great observations about the current state of affairs that range from the humorous to the troubling. I love this paragraph:

"Spare a thought for burglars, who now face urgent professional development challenges. What's the point of nicking a television when the streets are already full of them?"

Read the article online here.

Also, this article reminded me of a post by David Viens, one of the Plogue developers: Analog TV Death toll.

Anyway, despite all the teary eyes, the figures mentioned in the article suggest that 2012 should be a bumper year for the SCART Hunter!

Thursday 22 March 2012

Lost in Translation

Just a little tidbit I found on my phone that I've been meaning to post for a while...

A little translation mishap on the back of a SCART equipped Grundig DVD player that I gave to some friends. Wasn't until I was sitting in their kitchen, handing over the unit that I noticed this little grammatical error. Makes it sound like the DVD player has actual body parts and organs inside!


Found! Vintage CUC 4620

Well, I always said I'd never find another Grundig CUC 4635 chassis TV in Australia after I managed to burn the CUC 4635 I had. That particular chassis remains the best SCART replacement arcade chassis I've tried to date. It was just fantastic!

Amazingly, I found a Blaupunkt with a Grundig CUC 4620 chassis (very similar to CUC 4635) the other night on the side of the road, not far from where I live. My girlfriend spotted it while riding her bike to work. As it stands, the TV doesn't work properly. It power on, the screen lights up but the image is just black. No snow when I flick through the channels. Haven't tried it with RGB yet but I don't hold much hope. When I first plugged it in, I could see retrace lines across the screen. I turned the flyback down these went away. The flyback also hisses a bit. Not a good sign.

So, I have no idea if I'll ever be able to repair this. However, this time, I won't be so hasty to trash a non-working, vintage chassis. Hopefully I'll find another similar board (or receive that shipment from Germany) and this one can be used for spare parts.

At the very least, I have a little more hope of finding more of this chassis type in my part of the world. I really didn't think I'd see another one like that fabled CUC 4635! There's gotta be a couple more lurking in sheds in garages around the place...

Blaupunkt IS 70-39 VT (chassis FM 500.40)
Life on the street
The mean machine!

Monday 19 March 2012

It's... ALIVE!

Monday night is "movie night". A group of us get together, have dinner, chat and then, if we don't get carried away with talking, watch a film or TV series (Twin Peaks at the moment). We rotate between 3 different locations so everyone takes it in turn to be chef, video hirer and beer supplier.

It's pretty rare that we miss a Monday 'cause everyone is committed to this little gathering. However, tonight was one of those rare nights... So, one guess what I did with the extra hours I suddenly had on my hands...

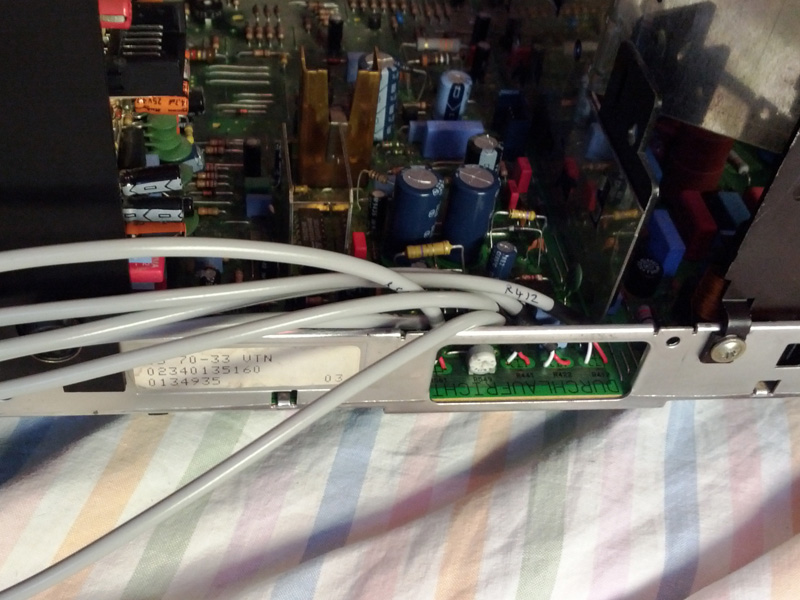
Well, it's finally finally complete! My Blaupunkt IS 70-33 VTN (chassis number 310.32) now has 6 external controls neatly mounted on the front panel under the screen. Everything is screwed back together and the guts are no longer hanging out the back. Everything is back to the original state except for the H-size, H-position, V-size, V-position knobs on the left and pincushion and trapezium controls on the right.

I have to say, this was a pretty momentous moment on my CRT/SCART/MAME journey! Up there with the golden moments like the first time I got a VGA to SCART cable working or first ran a progressive resolution using Soft 15-kHz.

With these external controls it's incredibly simple to get every resolution in MAME looking perfect. GroovyMAME does its best to get things right and then a few tweaks later I have perfect sizing and geometry. The cool thing is that you can adjust for things that GroovyMAME doesn't account for such as the inbuilt borders in the Metal Slug games or games that have scores and credit text pushed hard against a border.

Check out how the finished product looks! I'm pretty pleased considering I would never have dreamed of doing something like this when I first got into this hobby!

Front panel complete!
Pots mounted behind the front panel
Control cables soldered to the chassis
Phillips A66EAK220X01 tube taken from a Loewe Contur 770
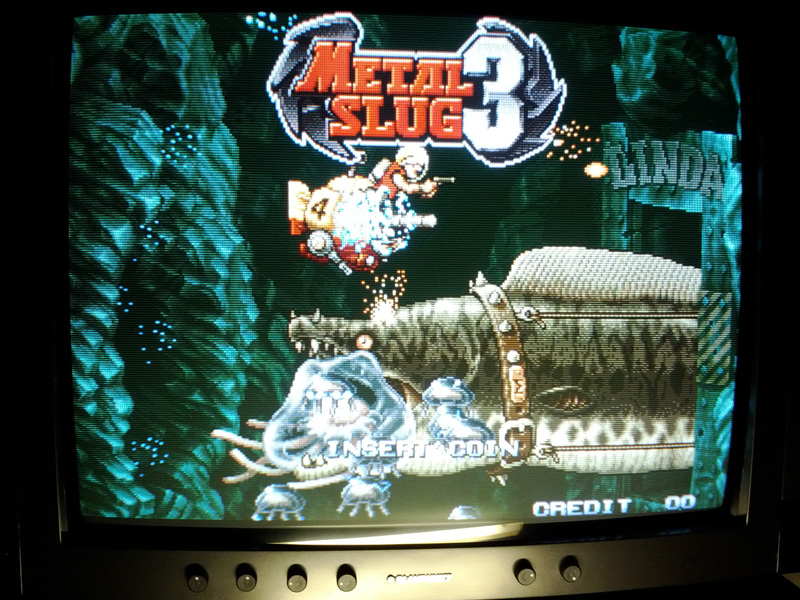
And now for the games... Look at all those tidy borders!

Street Fighter 2
Mortal Kombat
Golden Axe
Last Blade 2
Robocop
Legend of Hero Tonma
R-Type Leo
Metal Slug 3 (no borders!)
Aliens
Super Street Fighter 2
There are stills things to do: tidy up the internal wiring usual cable ties, finish cleaning the inside of casing, fine tune the GroovyMAME monitor specs, etc. but basically this project has reached its goal!

Might be time to actually play a game... ;)

Sunday 18 March 2012

1 knob in, 5 to go...

I got brave today and decided to drill some holes in my Blaupunkt. I'd been putting it off for weeks and was getting sick of the back case being off the TV with the innards exposed.

So, I pulled the chassis and daughter boards out and started scratching my head. How on earth was I going to going to get some 10mm holes accurately drilled into the front of this thing? Where to put them and how to measure them?

I decided the only way to proceed was to measure things up and then draw a mask. That way I could sticky tape the mask to the casing, line it up carefully, cross my fingers and then pull the trigger on the cordless drill.

Here's how it looked:
Mask taped down and midpoints marked with a Sharpie
First hole drilled
4 holes down. Not perfect... but acceptable
So far so good... but then time got away from me! The problem with soldering in the evening is that there's just not enough light. Without a flood of daylight it's just to hard too accurately place things and see exactly what you're doing. So, considering it's a Sunday, it looks like my room is going to be in crazy state until I next weekend (unless I magically find some free hours after work one night). Bummer. The good news is that the Phillips tube I transplanted in from the Loewe Contur I scored the other day is looking awesome. Just want to get this thing finished already!

Ugh! What a mess!
Tube balanced against a toddler's chair
Overheard view of the precarious mess
Chassis and case need to be exposed to hook the controls up

And... one knob in place! Works well. Really well. Just need those other five...

Width knob in place
The cool thing is that I now have three of these chassis. If this works out, I'll be able to perfect the process for the other two TVs. Phew!